Solar Food Dehydrating: How to Preserve Food Off-Grid Using the Sun
Build a DIY solar dehydrator to preserve fruits, vegetables, and meat without electricity — a critical skill when the grid goes down.
Why Solar Food Dehydrating Belongs in Every Preparedness Plan
Long before electricity powered our homes and grocery stores stocked our shelves, humans preserved food using the oldest and most reliable energy source available: the sun. Solar food dehydration is not a primitive fallback — it is a sophisticated, time-tested preservation method that belongs at the core of any serious off-grid preparedness strategy. When the grid goes down, your electric dehydrator becomes an expensive paperweight. A properly built solar dehydrator keeps working indefinitely, powered by nothing but sunlight.
According to the USDA, properly dehydrated foods can retain nutritional value and remain shelf-stable for anywhere from one to several years depending on storage conditions. Removing 80–95% of a food's moisture content inhibits the bacterial growth, mold, and enzymatic activity that cause spoilage. That is the entire science behind dehydration — and the sun does it for free.
Understanding the Two Primary Solar Drying Methods
Open-Air Sun Drying
The simplest approach is direct sun drying, where food is laid out on racks or hung in mesh nets under open sky. This method works well in hot, dry climates with low humidity — think the American Southwest, high desert regions, or anywhere with consistent summer temperatures above 85°F and relative humidity below 60%. For a ready-made solution, the CJGQ Sun Drying Mesh Hanging Food Dehydrator Net provides a quick, affordable entry point. These hanging mesh nets promote airflow on all sides of the food, reduce insect contact, and can be suspended between trees, under a porch overhang, or from any outdoor structure.
The limitation of open-air drying is environmental exposure. Humidity, insects, dust, and unpredictable weather are real threats to food quality. That is where a purpose-built solar dehydrator box changes the equation entirely.
The Solar Box Dehydrator
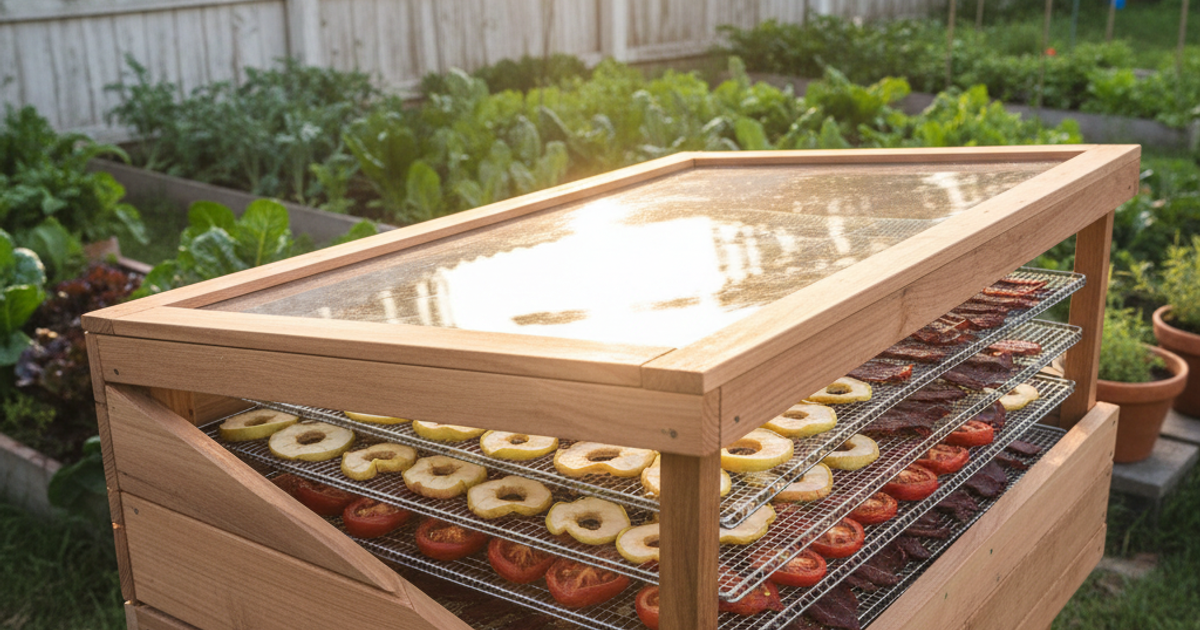
A solar box dehydrator is an enclosed structure that captures, concentrates, and circulates solar heat while protecting food from insects and contamination. Properly built units can achieve interior temperatures of 120–160°F — well within the USDA-recommended range of 130–160°F for dehydrating most fruits and vegetables. This enclosed design dramatically outperforms open-air methods in humid or variable climates.
How to Build a DIY Solar Food Dehydrator
Materials You Will Need
- Plywood (3/4 inch) for the box frame
- A sheet of clear tempered glass or twin-wall polycarbonate for the glazing panel
- Dark flat-black paint for the interior absorber surface
- Reflective insulation for heat retention
- Fiberglass mesh screen for drying trays
- Hinges, screws, and weatherstripping
- A simple thermometer to monitor internal temperature
Step-by-Step Construction
- Build the box frame. Construct a rectangular plywood box roughly 24 inches wide, 36 inches long, and 8 inches deep. The exact dimensions can be scaled to your needs, but this size accommodates multiple drying trays comfortably. Cut the top opening at a slight angle — ideally tilted to face true south at an angle equal to your latitude for maximum solar gain.
- Insulate the interior walls. Line the inside walls and bottom of the box with Reflectix BP24010 Reflective Insulation Roll. This double-bubble reflective material dramatically reduces heat loss through the wooden walls and bounces radiant energy back toward the food trays, helping the unit reach and maintain target temperatures even on partly cloudy days.
- Paint the absorber surface. Paint the bottom interior surface with flat black paint. This absorber layer converts sunlight into heat and is critical to the unit's performance. Do not skip this step.
- Build the drying trays. Construct simple wooden frames sized to slide into the box. Staple or tack Phifer BetterVue Fiberglass Mesh Screen Roll across each tray frame. Fiberglass mesh is preferable to aluminum window screen because it does not react with acidic foods, is food-safe, and is easy to clean. Stack multiple trays inside the box with one-to-two-inch gaps between each for airflow.
- Install the glazing. Attach your clear glass or polycarbonate panel over the angled top opening using hinges so it can be opened for loading and unloading. Seal the edges with weatherstripping to retain heat. The glazing acts like a greenhouse — allowing short-wave solar radiation in while trapping long-wave infrared heat inside.
- Create ventilation ports. Drill two to four one-inch holes along the lower back edge of the box and corresponding holes near the top front edge. Cover each hole with small pieces of mesh screen to keep insects out. This passive convection system draws cooler air in at the bottom and exhausts moist air at the top, which is essential for efficient drying. Without airflow, moisture released by the food simply recondenses inside the unit.
What You Can Preserve and How to Do It Right
Solar dehydration works exceptionally well for fruits, vegetables, herbs, jerky, and fish. Some general guidelines:
- Fruits: Slice uniformly to 1/4 inch thickness. Pre-treat with a lemon juice or ascorbic acid dip to prevent browning. Apples, peaches, apricots, figs, and tomatoes are ideal candidates.
- Vegetables: Blanch most vegetables briefly in boiling water before drying to halt enzyme activity that causes flavor and color degradation during storage. Corn, peppers, zucchini, and green beans dehydrate exceptionally well.
- Herbs: Require minimal preparation — simply remove stems and spread leaves thinly. Herbs dry rapidly, often within a single day in a solar box.
- Meat and fish: Slice lean meat into thin strips, marinate as desired, and dry at temperatures of at least 160°F to ensure pathogen destruction. Always confirm internal temperature with a reliable thermometer when processing meat.
Food is adequately dehydrated when it is leathery and pliable with no visible moisture pockets. Condition dried food by placing it loosely in a sealed jar for seven days, shaking daily. If condensation appears, return the food for additional drying.
Storing Your Dehydrated Harvest
Even perfectly dehydrated food degrades rapidly if stored improperly. Moisture, oxygen, light, and heat are the enemies of long-term storage. The gold standard is vacuum sealing. A reliable unit like the FoodSaver FM2000 Vacuum Sealer Machine removes oxygen from bags and creates an airtight seal that can extend the shelf life of dehydrated foods by two to three times compared to simple zip-lock storage. Store sealed portions in a cool, dark location — a root cellar, basement, or buried cache works well in a grid-down scenario.
Supplementing Solar with Electric Dehydrators
Serious preparedness means having layered redundancy. On days when sunlight is insufficient — overcast skies, winter months, or high-humidity conditions — an electric dehydrator bridges the gap while power is still available. The COSORI Food Dehydrator, Bigger Than 7 Trays with Large 6.5 inch Drying Space offers consistent temperature control across a large drying surface, making it efficient for processing large harvests quickly. For those newer to dehydrating or working with smaller batches, the Nesco FD-75A Snackmaster Pro Food Dehydrator is a proven, beginner-friendly unit with adjustable temperature settings and expandable tray capacity.
Use electricity while you have it. Build your solar dehydrator before you need it. That is the preparedness mindset that separates those who eat well after a disaster from those who scramble.
The Bottom Line
Solar food dehydrating is one of the most practical, cost-effective, and durable preservation skills you can develop. The initial investment in building a solar dehydrator is minimal — mostly lumber, screen material, and insulation — yet the return is enormous: a functional food preservation system that operates indefinitely without fuel, electricity, or complex maintenance. Start small, practice with seasonal produce now, and build your preserved food stockpile before a crisis makes it urgent. The sun is always working. Make sure your preparedness plan is too.
Choose ripe, unblemished fruits, vegetables, or herbs at their peak freshness. Wash all produce thoroughly under clean water to remove dirt and debris. Remove any bruised areas, stems, seeds, or pits as needed for your chosen foods. Cut your produce into consistent slices between 1/8 and 1/4 inch thick using a sharp knife or mandoline. Uniform thickness ensures even drying and prevents some pieces from spoiling while others are still drying. Thinner slices will dehydrate faster but may become brittle, while thicker pieces take longer but retain more texture. Dip light-colored fruits like apples, pears, or bananas in a solution of lemon juice and water (1:4 ratio) or ascorbic acid for 5 minutes. This prevents oxidation and browning during the drying process. Pat the pieces dry with a clean towel before placing them on drying trays. Place prepared food pieces in a single layer on mesh screens or trays, ensuring they don't overlap or touch. Leave small gaps between pieces to allow air circulation. Cover trays with cheesecloth or fine mesh to protect food from insects while still allowing moisture to escape. Place your solar dehydrator in an area that receives full, direct sunlight for at least 6-8 hours per day. Orient it to face south (in the Northern Hemisphere) for maximum sun exposure. Ensure the location has good airflow and is away from areas where dust or debris might contaminate your food. Check your food every 2-3 hours throughout the day, rotating trays if some areas receive more sun than others. Bring trays indoors overnight to prevent moisture reabsorption from dew. Drying times vary from 1-4 days depending on food type, thickness, humidity, and sun intensity. Food is fully dehydrated when it feels leathery or brittle with no moisture pockets when squeezed or bent. Condition dried food by storing it in glass jars for 7-10 days, shaking daily to distribute any remaining moisture. Once conditioned, store in airtight containers in a cool, dark location where properly dried food can last 6-12 months or longer.What You'll Need
Tools
Supplies
Step-by-Step Instructions
Step 1: Select and Prepare Your Produce
Step 2: Slice Food Into Uniform Pieces
Step 3: Pretreat Fruits to Prevent Browning
Step 4: Arrange Food on Dehydrator Trays
Step 5: Position Dehydrator in Direct Sunlight
Step 6: Monitor and Rotate Trays During Drying
Step 7: Test for Doneness and Store Properly