When EMS Is Gone: How to Build a Trauma Kit That Keeps Your Family Alive
When 911 goes unanswered and hospitals are overwhelmed, your trauma kit is the only thing standing between life and death.
When the grid goes down and EMS response times stretch from minutes to hours — or disappear entirely — your family's survival may hinge on what you have in a bag and whether you know how to use it. According to the American College of Surgeons, up to 20% of trauma deaths are potentially preventable with rapid hemorrhage control alone. In a true SHTF scenario, you become the first responder. There's no 911 to call, no ambulance rolling up the street, and no emergency room five minutes away. What you do in the first few minutes determines who lives and who doesn't.
Building a grid-down trauma kit isn't about buying the most expensive gear or filling a bag with supplies you'll never use. It's about understanding what kills people fastest in a trauma emergency and systematically equipping yourself to stop each one. Whether you're in a high-rise apartment in Chicago, a suburb outside Phoenix, or a rural homestead in rural Montana, the physiology of trauma is the same. The threats you'll face and the tools you need are remarkably consistent across environments.
Understanding the Threats That Kill First: The Tactical Combat Casualty Care Framework
Military medicine has taught us that trauma deaths follow a predictable sequence. The TCCC (Tactical Combat Casualty Care) framework, developed by the U.S. military and now widely adopted by civilian emergency medicine, identifies three primary preventable causes of death in the field:
- Uncontrolled hemorrhage — accounting for roughly 90% of preventable battlefield deaths
- Tension pneumothorax — a collapsed lung caused by a penetrating chest wound
- Airway obstruction — often from unconsciousness, facial trauma, or swelling
Your trauma kit must address each of these threats in order of priority. Everything else — wound cleaning, splinting, burn care — comes after. Preppers who stock bandages and antiseptic but skip tourniquets and chest seals are building a kit that will fail them when it matters most.
The Core Trauma Kit: Hemorrhage Control Supplies Every Prepper Needs
Hemorrhage control is your first and most critical priority. A human being can bleed to death from a major arterial wound in as little as three to five minutes. You won't be able to improvise your way through that with a roll of gauze and some tape.
Tourniquets: The Single Most Important Tool in Your Kit
Every adult member of your household or survival group should have immediate access to a quality tourniquet. The NAR North American Rescue CAT tourniquet is the gold standard — it's the same model issued to U.S. military personnel and is proven to stop life-threatening limb bleeding when applied correctly. Keep at minimum two per kit, and position them where they can be accessed in under ten seconds. Tuck one into your bug out bag, one in your vehicle kit, and one in your home kit mounted near the door.
For situations requiring a more compact option — particularly relevant for urban survival where a smaller everyday carry profile is important — the RATS rapid application tourniquet system offers an extremely packable alternative that can be applied one-handed and works on extremities of any size, including children and pets. It takes up almost no space and can ride in a pocket or clipped to gear without drawing attention — important for preppers who practice grey man principles.
Wound Packing: Hemostatic Gauze for Non-Compressible Wounds
Wounds in the groin, armpit, or neck can't be controlled with a tourniquet. For these so-called "junctional" wounds — and for any deep wound cavity — you need hemostatic gauze. QuikClot hemostatic gauze trauma dressing uses kaolin-impregnated gauze that dramatically accelerates clotting and has been shown in multiple studies to reduce blood loss by up to 50% compared to standard gauze. The technique is simple but critical: pack the wound tightly, applying direct pressure for a minimum of three minutes. Practice this skill — it's uncomfortable to do correctly, and hesitation costs lives.
Pressure Dressings for Large Wounds
Once a wound is packed, you need to maintain pressure. The Israeli bandage emergency pressure dressing — formally known as the Emergency Bandage — was developed by an Israeli military medic and is now used by emergency responders worldwide. It features a built-in pressure applicator bar that lets a single person apply and maintain consistent pressure without assistance. For apartment dwellers and urban preppers with limited kit space, this bandage is exceptional value — it consolidates several functions into one compact, easy-to-apply package.
Chest Wounds: Sealing a Tension Pneumothorax Before It Becomes Fatal
A penetrating chest wound — from a gunshot, knife, or impalement — can cause air to enter the chest cavity with every breath, collapsing the lung and eventually shifting the heart. This is a tension pneumothorax, and it's fatal without intervention. The treatment in the field is a vented chest seal applied immediately over the wound.
The Hyfin chest seal vented wound dressing is the preferred choice for preppers and first responders alike. It features a tri-fold design with multiple venting channels that allow air to escape the chest cavity while preventing more from entering. Stock at least two per kit — chest wounds often have both an entry and exit wound, and both must be sealed. This is non-negotiable survival gear if you live in an area with elevated threat levels or are building a comprehensive SHTF medical kit.
Beyond Hemorrhage: Secondary Trauma Supplies Your Kit Needs
Once you've addressed the three immediate killers, your kit should include supplies for managing secondary injuries that will become life-threatening over hours and days without professional care.
Airway Management
- Nasopharyngeal airway (NPA) — a flexible rubber tube inserted through the nostril to maintain airway in an unconscious patient
- Surgical lubricant for NPA insertion
- Basic knowledge of the recovery position
Wound Care and Infection Control
- Sterile saline or clean water for wound irrigation
- Povidone-iodine solution
- Irrigation syringe (18-gauge tip generates the pressure needed for effective cleaning)
- Assorted non-adherent dressings and medical tape
- Closure strips and suture kit for wound closure
- Nitrile gloves — multiple pairs — for infection control
Fractures and Musculoskeletal Injuries
- SAM splints in multiple sizes
- Elastic bandage wraps (ACE bandages)
- Triangular bandages for slings
Burns
- Water-gel burn dressings (Burnshield or equivalent)
- Non-stick telfa pads
- Cling wrap as a temporary burn cover
Medications
- Diphenhydramine (Benadryl) for allergic reactions
- Epinephrine auto-injector (EpiPen) if anyone in your group has severe allergies
- Ibuprofen and acetaminophen for pain and fever
- Oral rehydration salts
- Broad-spectrum antibiotics (discuss with your physician — some prescribe these for emergency kits)
For a deeper dive into pharmaceutical preparedness, our article on Medication Stockpiling: How to Build a Prescription and OTC Drug Reserve for Long-Term Emergencies covers the topic comprehensively.
Kit Organization: How to Set Up Your Trauma Kit for Zero-Light, High-Stress Access
Your trauma kit is worthless if you can't find what you need in 30 seconds under stress. Organize by priority and use color-coded pouches or clear zipper bags within a single carrier:
- Red pouch — Life threats: Tourniquets, hemostatic gauze, chest seals, pressure bandage
- Yellow pouch — Wound care: Irrigation supplies, dressings, closure strips, gloves
- Blue pouch — Medications: All pharmaceutical supplies clearly labeled
- Green pouch — Secondary care: Splints, burn dressings, airway supplies
Mount your red pouch — the bleeding control items — on the outside of the kit or in an immediately accessible pocket. Seconds matter. Consider keeping a smaller "blowout kit" (tourniquet, one package of hemostatic gauze, pressure bandage, gloves) in your everyday carry bag, vehicle, and workplace. For those also thinking about Wilderness Medicine for Preppers: How to Treat Life-Threatening Injuries When Help Is Never Coming, many of the same principles and supplies apply in remote environments where help is simply not coming.
Training: The Supply Without Training Is Just Expensive Clutter
Equipment without training is a dangerous false sense of security. At minimum, every adult in your household should complete a Stop the Bleed course — it's free, takes about two hours, and is available in most cities and towns through hospitals, fire departments, and community organizations. For more advanced skills, seek out:
- TCCC (Tactical Combat Casualty Care) or civilian equivalent courses
- Wilderness First Aid (WFA) or Wilderness First Responder (WFR) certification
- Local Red Cross first aid and CPR certification
- Hands-on practice with your actual gear — including tourniquet application on yourself with one hand
Practice wound packing with a training manikin or a simple foam block. Tourniquet application must be muscle memory — your hands need to know what to do when your brain is in crisis mode. Urban preppers should note that Stop the Bleed courses are increasingly available in major cities and are just as relevant for apartment dwellers as for homesteaders.
Scaling Your Kit for Urban Apartments Versus Rural Homesteads
Your environment shapes your kit's scope. Urban preppers and apartment dwellers face different risk profiles than rural homesteaders, but the core trauma supplies remain constant. Where the kits diverge:
Urban/Apartment Kit Considerations: Compact size matters. You may be evacuating on foot. Focus on portability — a compact IFAK (Individual First Aid Kit) pouch that integrates with your bug out bag is ideal. Proximity to other people means you're more likely to be rendering aid to strangers, so stock for multiple patients where pack weight allows.
Rural/Homestead Kit Considerations: Extended care duration is your challenge. When the nearest hospital is 45 minutes away on a good day, you need deeper supplies and more advanced skills. Stock for wound closure, IV fluid administration if trained, and prolonged field care. Consider a dedicated medical cabinet rather than a single bag.
In either setting, proper hygiene is inseparable from trauma care — infected wounds kill just as surely as the initial injury. Our guide on Grid-Down Laundry and Hygiene: How to Stay Clean When Running Water Disappears addresses the sanitation challenges that directly impact wound care and infection prevention.
Recommended Gear Summary
To build a complete grid-down trauma kit, prioritize these proven products from your survival gear list. The NAR North American Rescue CAT tourniquet and QuikClot hemostatic gauze trauma dressing form the non-negotiable foundation. Add the Israeli bandage emergency pressure dressing for wound pressure management, the Hyfin chest seal vented wound dressing for penetrating chest trauma, and the RATS rapid application tourniquet system as a compact backup tourniquet for your EDC or bug out bag. These five items alone represent the difference between a real trauma kit and a collection of bandages. Browse our full Recommended Survival Gear & Equipment page for additional vetted options across all preparedness categories.
What You'll Need
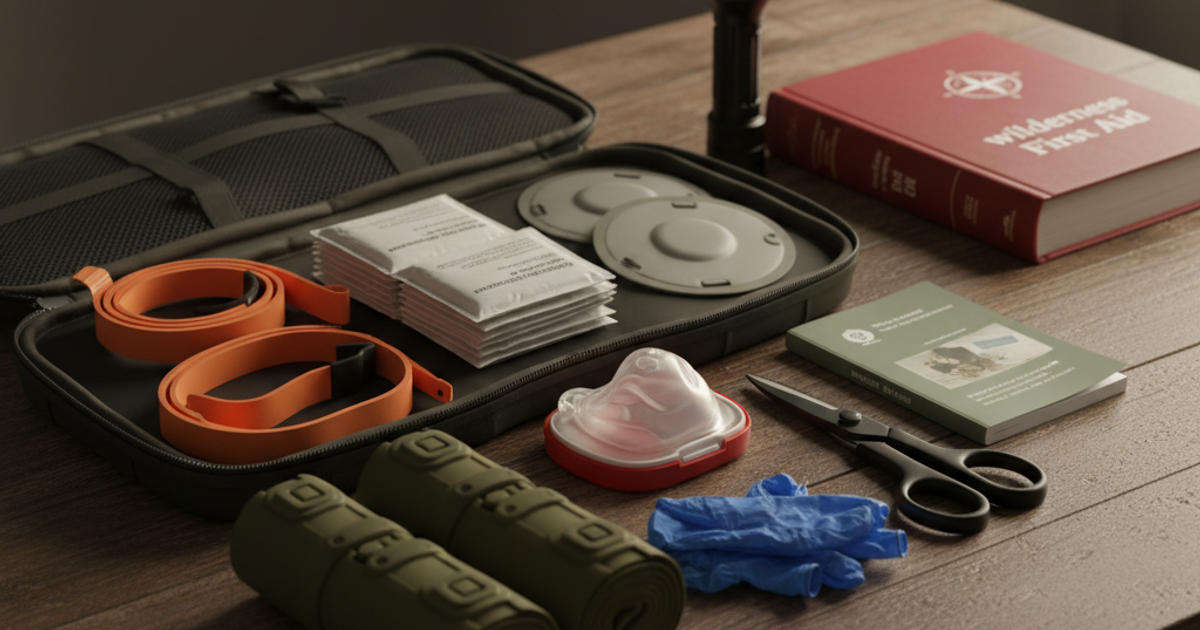
- Waterproof hard-shell case or tactical bag (minimum 10" x 8" x 4")
- Tourniquets (CAT or SOFT-T, minimum 2)
- Hemostatic gauze (QuikClot or Celox, 2-3 packs)
- Israeli or pressure bandages (4-6)
- Chest seals (vented, 2 pairs)
- Compressed gauze rolls (6-8)
- Trauma shears
- Nitrile gloves (10+ pairs)
- Nasopharyngeal airway (NPA, 2 sizes)
- Permanent marker
- Medical tape (2 rolls)
- CPR face shield
- Space blankets (2-3)
- Antibiotics (if available through medical consultation)
- Pain management supplies (ibuprofen, acetaminophen)
- Irrigation syringes and saline solution
Step-by-Step Instructions
Step 1: Select and Organize Your Container by Injury Priority
Choose a waterproof hard-shell case or tactical MOLLE bag that can withstand drops and weather exposure. Organize supplies into clear compartments or ziplock bags labeled by emergency type: "BLEEDING," "AIRWAYS," "BURNS," and "WOUNDS." Place the most critical life-threatening injury supplies—tourniquets, hemostatic gauze, and chest seals—in the top layer or front pocket for immediate access. Your container should be lightweight enough to carry in a crisis but protective enough to keep sterile items sealed.
Step 2: Stock Bleeding Control as Your Primary Focus
Severe hemorrhage kills faster than any other trauma injury, so dedicate 60% of your kit to bleeding control. Include at least two CAT or SOFT-T tourniquets, which can stop arterial bleeding in limbs within seconds. Add 2-3 packs of hemostatic gauze for wounds where tourniquets won't work—neck, groin, or abdomen injuries. Pack 4-6 Israeli or pressure bandages that combine gauze and pressure application, along with standard compressed gauze for wound packing.
Step 3: Prepare for Chest Trauma and Airway Emergencies
Penetrating chest injuries create life-threatening air leaks that standard bandages can't seal. Include two pairs of vented chest seals designed for sucking chest wounds—vented models allow trapped air to escape while preventing outside air from entering. Add two sizes of nasopharyngeal airways (NPAs) to maintain breathing passages in unconscious patients without risking jaw injury. Include a CPR face shield to enable rescue breathing while protecting yourself from bloodborne pathogens.
Step 4: Add Infection Prevention and Wound Care Supplies
Without hospital antibiotics, infection becomes a delayed killer in grid-down scenarios. Stock 10+ pairs of nitrile gloves to maintain clean technique during every intervention. Add irrigation syringes and sterile saline for flushing debris from wounds before closure. Include antibacterial ointment, medical tape, and various sizes of sterile gauze pads for covering cleaned wounds. If possible through medical consultation, add a course of broad-spectrum oral antibiotics like amoxicillin or doxycycline.
Step 5: Include Documentation and Assessment Tools
Add a permanent marker to write treatment times directly on tourniquets or the patient's skin—critical for tracking when interventions occurred. Include a small notepad and pencil for recording vital signs, medication doses, and injury progression over hours or days. Pack a compact reference card with normal vital sign ranges, tourniquet application reminders, and dosing charts for common medications. A small LED flashlight or headlamp enables pupil checks and wound inspection in low-light conditions.
Step 6: Pack Environmental Protection and Comfort Items
Shock and hypothermia kill trauma patients even after bleeding is controlled, especially when EMS transport isn't coming. Include 2-3 space blankets to retain body heat and prevent shock progression. Add triangle bandages that can create slings, secure splints, or provide additional pressure. Pack pain management supplies including maximum-strength ibuprofen and acetaminophen, as untreated pain worsens shock and prevents rest needed for healing.
Step 7: Train on Every Item and Rotate Perishables Quarterly
A fully stocked kit is worthless if you freeze under pressure—dedicate monthly training sessions to practice tourniquet application, wound packing, and chest seal placement on family members. Take a Stop the Bleed or wilderness first aid course to build muscle memory for high-stress scenarios. Every three months, check expiration dates on hemostatic gauze, chest seals, and medications, rotating older stock into practice sessions before replacing. Store your completed kit in a climate-controlled location everyone knows, and keep a second kit in your vehicle.
Frequently Asked Questions
What is the most important item to have in a grid-down trauma kit?
A tourniquet is the single most important item in any trauma kit. Uncontrolled hemorrhage from a limb wound is the leading cause of preventable death in trauma emergencies, and a properly applied tourniquet can stop it in seconds. The NAR CAT tourniquet is the clinical and military gold standard. Stock at least two and make sure every adult in your group knows how to apply one — including on themselves — in under 60 seconds.
How do I build a trauma kit if I live in an apartment with limited space?
Urban preppers can build a highly effective compact trauma kit in a pouch the size of a hardcover book. Prioritize density: one CAT tourniquet, one package of hemostatic gauze, one Israeli pressure bandage, two chest seals, two pairs of nitrile gloves, and a small airway kit covers the life-threatening emergencies. This kit weighs under two pounds and fits in a dedicated pouch in your bug out bag or on a shelf near your apartment door. Expand to a full kit in a larger bag for home use and keep the compact IFAK for mobility.
Do I need medical training to use a trauma kit effectively?
Training is essential, not optional. Supplies without skills create a dangerous false sense of security. At minimum, complete a free Stop the Bleed course, which covers tourniquet application and wound packing in about two hours. For more comprehensive emergency preparedness, pursue Wilderness First Aid certification, which is specifically designed to bridge the gap when professional help is unavailable. Practice hands-on with your actual gear regularly — muscle memory built in calm conditions saves lives in chaotic ones.
Affiliate Disclosure: SHTF Plan participates in the Amazon Services LLC Associates Program. Some links are affiliate links — we may earn a small commission at no extra cost to you.