DIY Solar Water Heater: Off-Grid Hot Water Without the Energy Bill
Learn how to build a low-cost solar water heater that keeps hot water flowing when the grid goes down — no electricity or gas required.
Why Off-Grid Hot Water Should Be Part of Every Prepper's Emergency Preparedness Plan
Most preppers spend considerable energy stockpiling emergency food storage, building out their bug out bag, and hardening their perimeter — but hot water is one of the most overlooked elements of long-term survival infrastructure. When the grid goes down, you lose more than lights and appliances. You lose sanitation, wound care capability, cooking efficiency, and basic comfort that keeps morale from collapsing. A DIY solar water heater solves that problem permanently, using nothing but sunlight.
According to the U.S. Department of Energy, water heating accounts for roughly 18% of a typical home's energy use — making it the second largest energy expense in most households. In an off-grid or SHTF scenario, that 18% has to come from somewhere. Solar thermal systems are one of the most cost-effective and low-maintenance ways to generate it without fuel, batteries, or grid dependency.
This isn't theoretical prepper gear wishful thinking. Solar water heating is a proven technology used in over 400 million systems worldwide, particularly in regions of Europe, China, Israel, and Australia where energy costs are high and reliability is valued. For the serious prepper, it's a foundational off-grid system right up there with rainwater harvesting and composting sanitation.
How a DIY Solar Water Heating System Actually Works
Before you start buying parts, you need to understand what you're building. Solar water heaters work by capturing solar radiation and transferring that heat to a water supply stored in an insulated tank. There are two main configurations:
- Passive systems — no pumps, no electricity, no moving parts. Water circulates by thermosiphon (hot water rises naturally). Simple, reliable, and perfect for true off-grid use.
- Active systems — use a small pump and controller to move water or heat-transfer fluid between the collector and the tank. More efficient but require a minimal power source.
For most preppers building a primary or backup system, a passive thermosiphon setup is the gold standard for reliability. An active system can be powered by a small photovoltaic panel, keeping the whole setup self-contained and grid-independent.
Choosing the Right Solar Collector for Your Off-Grid Setup
The solar collector is the heart of your system. Two primary types dominate the market:
Flat Plate Collectors
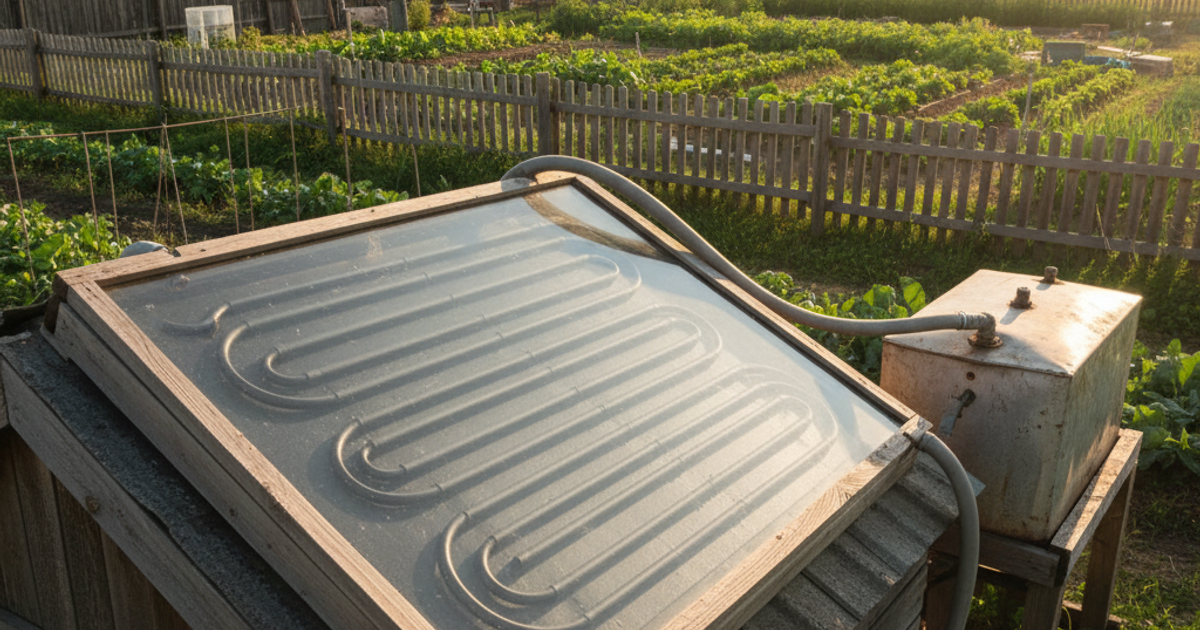
Flat plate collectors are the workhorses of residential solar heating. They consist of a glazed, insulated box containing an absorber plate with copper tubes bonded to it. They perform well in moderate climates and sunny conditions. The Duda Energy flat plate solar collector panel is a well-regarded option among off-grid builders — it's a durable, properly sized unit that integrates cleanly into DIY thermosiphon builds and can handle the demanding conditions of year-round outdoor installation.
Evacuated Tube Collectors
Evacuated tube collectors outperform flat plate systems in cold or overcast conditions. Each tube contains a vacuum-sealed glass layer that dramatically reduces heat loss — think of it as a thermos bottle that captures solar energy. For preppers in northern climates or high-altitude locations, this type offers superior performance when you need it most. The Apricus evacuated tube solar collector is a professional-grade option trusted in both residential and commercial installations, and individual tubes can be replaced if damaged — a critical advantage when replacement parts may be scarce in an extended emergency.
Step-by-Step: Building a Basic Passive Solar Water Heater
- Site selection: Mount your collector on a south-facing roof or ground frame, angled at your latitude (roughly 30–45 degrees for most of the continental U.S.). Avoid shading from trees or structures between 9 a.m. and 3 p.m.
- Storage tank positioning: In a thermosiphon system, the storage tank must sit above the collector. This allows hot water to rise naturally into the tank while cooler water drops back down. A height difference of at least 18 inches is the minimum; more is better.
- Insulated storage tank: Your storage tank is where heated water waits until you need it. Proper insulation is non-negotiable — uninsulated tanks will lose heat overnight and undermine your entire system. The SunBanker solar water heater storage tank is specifically designed for solar thermal applications with high-grade insulation that maintains temperature through cold nights.
- Plumbing connections: Use copper or high-temperature-rated PEX tubing. Connect the collector outlet to the top of the tank and the collector inlet to the bottom. Keep runs short and insulate all exposed pipe.
- Pressure relief valve: Never skip this. Solar collectors can generate surprisingly high temperatures. A properly rated pressure relief valve prevents dangerous overpressure buildup.
- Testing: Before finalizing all connections, pressure test with water and check every joint for leaks. Let the system run for a full sunny day and monitor outlet temperatures — a properly functioning system should deliver water between 120°F and 160°F.
Upgrading to an Active System for Higher Efficiency
If you want to maximize hot water output — especially through a longer season or in a larger household — an active system with a small circulation pump is worth the added complexity. The Grundfos solar circulation pump is an industry-standard choice for solar thermal applications. It's energy efficient, quiet, and reliable under continuous operation — exactly what you need in an off-grid system you're depending on daily.
Active systems also benefit from a differential temperature controller, which monitors the temperature difference between your collector and your storage tank. When the collector is hot enough to add heat to the tank, it switches the pump on. When temperatures equalize (such as at night or on heavily overcast days), it shuts the pump off to prevent reverse circulation that would actually cool your water. The Watts solar differential temperature controller is a dependable unit that integrates easily with most DIY solar thermal builds and runs on minimal power — easily handled by a small dedicated PV panel.
Water Source Integration and Purification Considerations
Your solar water heater is only as good as the water going into it. If you're drawing from a rainwater collection system, well, or surface source, you need to address water quality before it enters your heating loop — particularly if the heated water will be used for drinking or cooking. High temperatures (above 140°F) will kill most pathogens, but sediment and chemical contaminants require filtration. Pre-filter all source water before it enters the storage tank.
For a complete off-grid water system, pair your solar heater with our guide on building a low-cost rainwater harvesting system — together, these two systems give you a reliable, self-sustaining hot water supply with no utility bills and no grid dependency.
Freeze Protection and Year-Round Operation
Freeze protection is the most critical design consideration in colder climates. Three primary strategies exist:
- Drainback systems — water drains out of the collector automatically when the pump stops, preventing freezing. Requires careful installation with proper slope on all lines.
- Antifreeze loop — a closed loop of food-safe propylene glycol runs through the collector and transfers heat through a heat exchanger to your potable water. Excellent freeze protection but adds complexity.
- Drain-down valves — simple automatic valves that drain exposed piping when temperatures drop near freezing. A good low-cost option for mild winter climates.
If you're serious about year-round hot water as part of your overall bug-in preparedness infrastructure, invest in proper freeze protection from the start. A burst collector in January is not a SHTF problem you want to troubleshoot in the cold.
Cost, ROI, and Long-Term Value for the Off-Grid Prepper
A basic DIY passive solar water heater can be built for $300–$800 in materials, depending on tank size and collector type. Active systems with pumps and controllers typically run $600–$1,500 for a complete setup. The DOE estimates that solar water heaters can reduce water heating bills by 50–80%, with average payback periods of 5–10 years in grid-connected homes. In a true off-grid or emergency scenario, the value is incalculable — you simply cannot put a price on reliable hot water when conventional options are gone.
Hot water also supports your broader preparedness ecosystem. It improves sanitation alongside a DIY composting toilet setup, enables proper food hygiene when you're processing meat from your livestock, and supports wound care and basic medical needs when professional healthcare isn't available.
What You'll Need
- Black garden hose (50-100 feet, depending on your hot water needs)
- Plywood sheet (4' x 8')
- Insulation board (1-2 inches thick)
- Black spray paint or flat black latex paint
- Clear polycarbonate or acrylic sheet (4' x 8')
- Hose connectors and shutoff valves
- Wood screws and silicone sealant
- Reflective insulation or aluminum foil
- Storage container or insulated water tank
- Thermometer
Step-by-Step Instructions
Step 1: Build the Collector Box Frame
Cut your plywood to create a shallow box frame approximately 4 feet by 8 feet with 4-inch sides. Attach the insulation board to the bottom of the box using wood screws and silicone sealant to prevent heat loss. Line the insulation with reflective material or aluminum foil to maximize heat reflection toward the water coils. Ensure all seams are sealed tightly to create an insulated chamber that will trap solar heat effectively.
Step 2: Coil and Secure the Black Hose
Spray paint your garden hose completely black if it isn't already, as black absorbs maximum solar radiation. Coil the hose in a spiral or serpentine pattern inside the collector box, spacing the coils about 1-2 inches apart for optimal heat absorption. Secure the hose to the insulation board using cable ties, clips, or small brackets at regular intervals. Leave sufficient hose length at both ends (about 3 feet each) to connect to your water source and collection point.
Step 3: Install the Transparent Cover
Place the clear polycarbonate or acrylic sheet over the top of the collector box to create a greenhouse effect. Seal all edges with silicone sealant to make the box weatherproof while trapping heat inside. Drill small weep holes at the bottom corners to allow any condensation to drain out. The transparent cover should be securely fastened but removable for maintenance and cleaning of the interior components.
Step 4: Position the Solar Collector
Place your solar water heater in a location that receives maximum direct sunlight throughout the day, ideally facing south (in the Northern Hemisphere) at a 30-45 degree angle. Mount it on a secure, elevated platform or roof that can support the weight when filled with water. Ensure the outlet end is slightly higher than the inlet to prevent air pockets and allow proper water circulation. Consider seasonal sun angles and potential shading from trees or structures when selecting your location.
Step 5: Connect the Water Supply System
Attach the inlet end of your coiled hose to your water source using appropriate connectors and install a shutoff valve for control. Connect the outlet end to your storage tank or directly to where you need hot water, ensuring this connection is also fitted with a valve. Use food-grade hoses if you plan to use this water for drinking or cooking. Test all connections for leaks before filling the system completely.
Step 6: Set Up Water Circulation
For a passive system, position your storage tank above the collector so heated water naturally rises into the tank while cooler water flows down to be heated. For active circulation, install a small 12V DC pump powered by a solar panel to move water through the system. Add a bypass valve so you can drain the system during freezing weather or for maintenance. Monitor the water temperature at the outlet to determine optimal flow rates for your climate and water needs.
Step 7: Test and Optimize Performance
Fill the system with water on a sunny day and monitor the temperature increase over 2-4 hours using your thermometer. Adjust water flow rates to achieve desired temperatures—slower flow produces hotter water but less volume. Insulate all exposed pipes and the storage tank with foam pipe insulation to minimize heat loss. Keep the transparent cover clean and check the system regularly for leaks, and consider adding a temperature relief valve if water exceeds 160°F for safety.
Frequently Asked Questions
How much hot water can a DIY solar water heater produce in a day?
A well-designed passive solar water heater with a single flat plate collector (roughly 20 square feet) can heat 40–80 gallons of water per day under good solar conditions. This is sufficient for a family of 2–4 for basic hygiene, cooking, and sanitation needs. Evacuated tube collectors and active pumped systems can push output higher, particularly in colder months. Sizing depends on your daily demand and your local solar irradiance — the NREL's PVWatts tool can help estimate expected solar input for your location.
Can a DIY solar water heater work as part of an emergency preparedness plan when the grid goes down?
Absolutely — and this is precisely why serious preppers prioritize solar thermal systems. A passive thermosiphon system has zero electrical components, meaning it functions completely independently of the grid. Even an active system can be powered by a single small solar panel. Unlike on-demand water heaters that rely on gas or electricity, a solar thermal system continues producing hot water in a prolonged outage, natural disaster, or SHTF scenario as long as the sun shines. It's one of the most resilient and low-maintenance infrastructure investments an off-grid prepper can make.
What survival gear and tools do I need to build a DIY solar water heater?
The core components are a solar collector (flat plate or evacuated tube), an insulated storage tank, copper or high-temp PEX tubing, pipe insulation, mounting hardware, a pressure relief valve, and basic plumbing tools including a pipe cutter, soldering kit (for copper), and adjustable wrenches. For an active system, add a small circulation pump and differential temperature controller. Most of these components can be sourced online or at plumbing supply stores, and the skill level required is comparable to basic home plumbing. No specialized licenses are required for a self-contained solar thermal system in most jurisdictions, though always verify local codes before installation.
Affiliate Disclosure: SHTF Plan participates in the Amazon Services LLC Associates Program. Some links are affiliate links — we may earn a small commission at no extra cost to you.