Chest Seals, Tourniquets, and Hemostatic Gauze: How to Build a Gunshot Wound Kit That Actually Saves Lives
When gunfire erupts and EMS is 20 minutes out, the right trauma kit and the knowledge to use it is the only thing standing between life and death.
A gunshot wound can kill in under three minutes from hemorrhagic shock. EMS average response times in rural areas exceed 18 minutes — and in a true SHTF scenario, help may never come at all. Whether you live in a high-rise apartment in Chicago, a suburb of Houston, or on forty acres in rural Montana, the calculus is the same: if you can't stop the bleeding yourself, the victim dies.
This is why Tactical Combat Casualty Care (TCCC) principles have migrated from the battlefield into civilian emergency preparedness. The same hemorrhage control techniques that have reduced preventable battlefield deaths by over 85% since the wars in Iraq and Afghanistan can be applied by a trained civilian with the right gear. According to the Journal of Trauma and Acute Care Surgery, extremity hemorrhage is the leading cause of preventable death in trauma patients — and it's almost entirely stoppable with proper tools and training.
Building a purpose-built gunshot wound kit is not about being paranoid. It's about understanding that mass casualty events, home invasions, hunting accidents, and grid-down medical emergencies are real possibilities that do not care about your zip code. This guide will walk you through every component, explain why each item exists, and show you how to use them when seconds count. For a broader trauma kit foundation, see our guide on how to build a trauma kit that keeps your family alive when EMS is gone.
What You'll Need
Tools
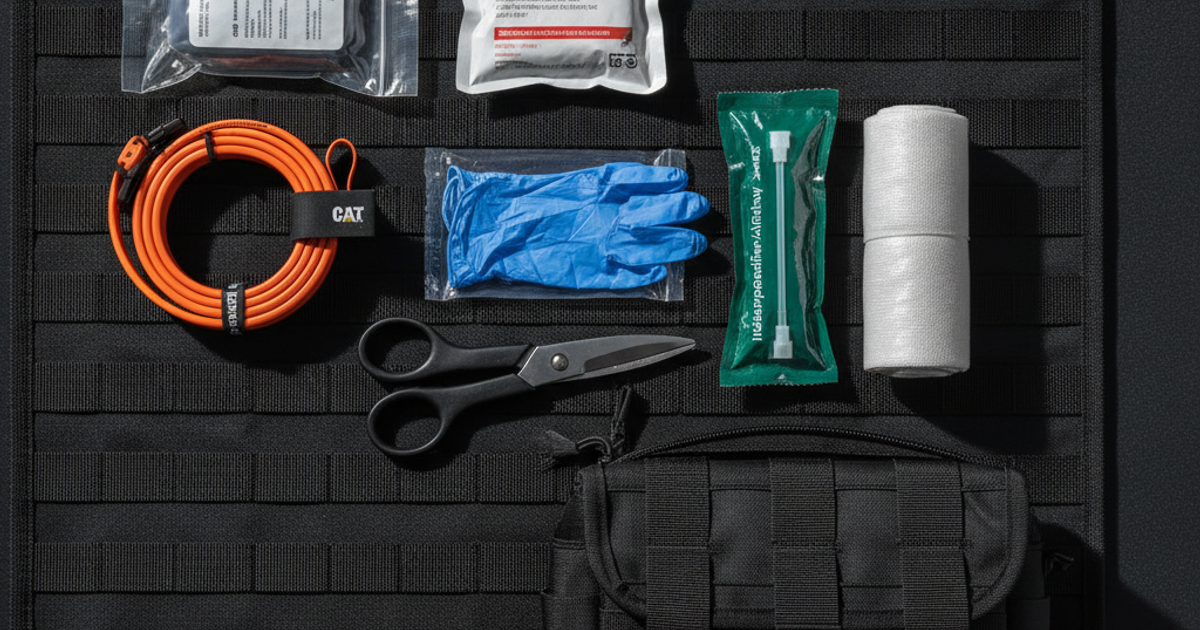
- Trauma shears / heavy-duty medical scissors
- Nitrile gloves (multiple pairs)
- Permanent marker (for tourniquet time notation)
Supplies
- NAR North American Rescue CAT Tourniquet Gen 7
- Hyfin Vent Chest Seal Twin Pack
- QuikClot Hemostatic Gauze Combat Gauze
- Israeli Bandage Emergency Pressure Dressing (4-inch)
- NARESCUE Rescue Essentials IFAK Trauma Kit Pouch
- Nasopharyngeal airway (NPA) with lubricant
Understanding the Lethal Triad: Why Gunshot Wounds Kill
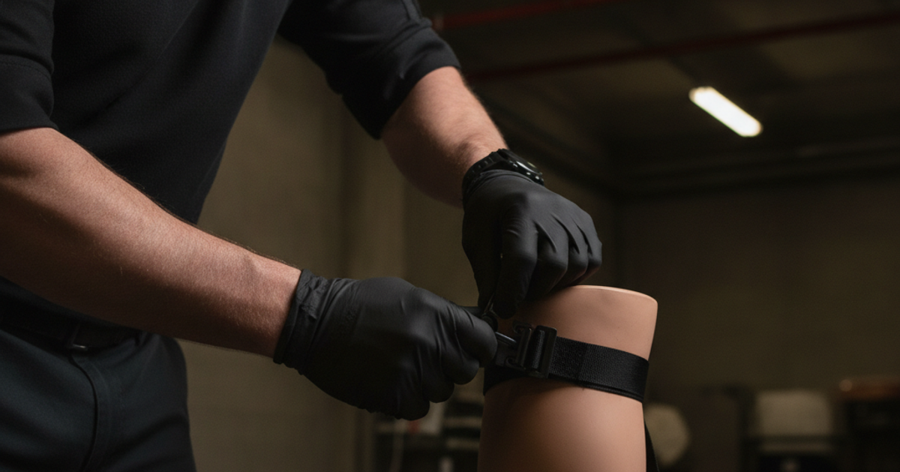
Gunshot wounds kill through three primary mechanisms: uncontrolled hemorrhage, tension pneumothorax (collapsed lung), and airway obstruction. TCCC doctrine addresses all three, but hemorrhage control is the first and most critical priority. The "golden hour" is a myth in penetrating trauma — with arterial bleeding, you may have as little as 90 seconds before irreversible shock begins.
Modern civilian TCCC — often taught as "Stop the Bleed" or tactical first aid — organizes response around the MARCH protocol: Massive hemorrhage, Airway, Respiration, Circulation, Hypothermia. Your gunshot wound kit should address each of these elements with dedicated tools, not improvised solutions.
Tourniquets: The Single Most Important Item in Your Kit
A properly applied tourniquet is the difference between life and death for any extremity wound with arterial involvement. Despite persistent myths, tourniquets do not routinely cause limb loss when applied correctly and removed within the appropriate time window (generally within 2 hours in a hospital setting). Military data from the wars in Afghanistan and Iraq confirms that not one single properly applied tourniquet resulted in a preventable death from limb loss — the opposite is overwhelmingly true.
The gold standard for civilian and military use is the NAR North American Rescue CAT Tourniquet Gen 7. The Combat Application Tourniquet (CAT) is the most widely issued tourniquet in the U.S. military and has been validated in thousands of real-world applications. Its windlass design allows one-handed self-application, which is critical if you are the one who's been shot. Always buy genuine, name-brand tourniquets — counterfeit versions fail at critical moments, and the price difference is irrelevant when your life is on the line.
A worthy alternative with a slightly different mechanism is the SOFTT-W SOF Tactical Tourniquet Wide. The SOFTT-W uses a dual-buckle system and is preferred by some operators for its lower-profile carry and ease of application on larger limbs. Having at least two tourniquets in your kit is not overkill — a single patient can receive multiple gunshot wounds, and you may need to treat both arms or both legs simultaneously.
For wounds in the groin, axilla (armpit), or at the base of the neck — areas where a standard tourniquet cannot be applied — the SAM Medical Junctional Tourniquet is the solution. Junctional wounds are among the most challenging hemorrhage scenarios because they cannot be managed with a limb tourniquet, yet they carry an extremely high mortality rate. The SAM JT uses targeted compression to occlude blood flow at the femoral or axillary arteries. This is an advanced piece of kit, but for serious preppers and anyone in a rural area far from trauma centers, it belongs in your advanced trauma package.
Chest Seals: Treating Penetrating Thoracic Trauma
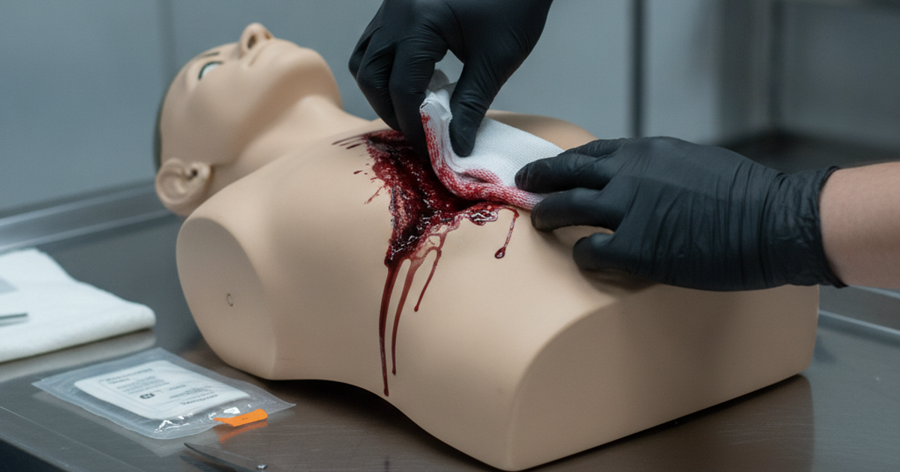
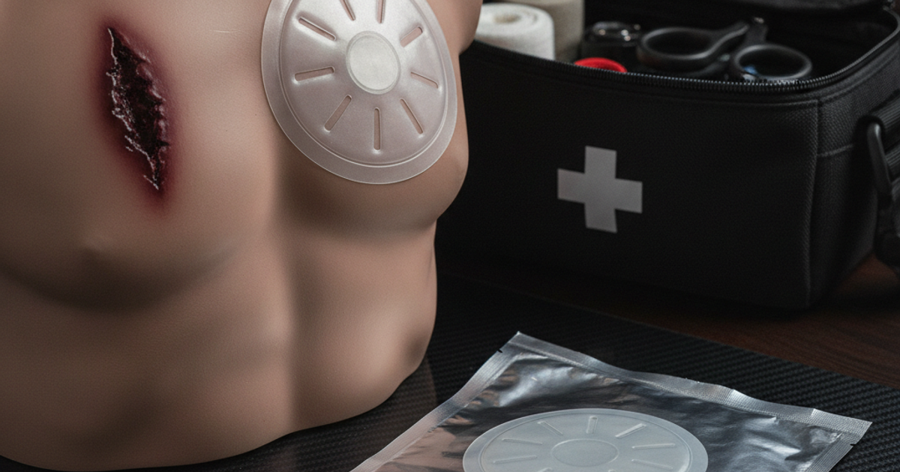
A gunshot wound to the chest creates what's called a "sucking chest wound" — a penetrating injury that allows air to enter the pleural space through the wound rather than through the trachea. This disrupts the negative pressure system that keeps your lungs inflated. Left untreated, it progresses to tension pneumothorax, which is fatal. A chest seal is a vented occlusive dressing that covers the wound while allowing air to escape, preventing dangerous pressure buildup.
The Hyfin Vent Chest Seal Twin Pack is the current standard of care for penetrating chest trauma in both military and civilian settings. It comes in a twin pack for good reason: a bullet typically creates both an entry and an exit wound, and both must be sealed. The Hyfin's vented (flutter-valve) design allows air to escape on exhalation while preventing air from entering through the wound on inhalation. The adhesive backing sticks even to bloody, wet skin — a critical feature that non-vented dressings often fail to provide.
Application is straightforward: expose the wound, wipe away as much blood as possible, remove the backing, and press firmly from the center outward. Monitor the patient closely — if their condition deteriorates after sealing, suspect a developing tension pneumothorax and be prepared to burp (momentarily lift) the seal to release trapped air.
Hemostatic Gauze: Packing Wounds You Can't Tourniquet
Not every wound is in a location accessible by tourniquet. Abdominal wounds, chest wounds, and deep tissue injuries require wound packing with hemostatic gauze — gauze impregnated with a clotting agent that accelerates the body's natural coagulation cascade and significantly reduces time to hemorrhage control.
QuikClot Combat Gauze is the current standard issued to U.S. military personnel. It uses kaolin, an inorganic mineral, to activate clotting factors directly at the wound site. Studies published in the Journal of Trauma have shown Combat Gauze to be superior to standard gauze in achieving hemostasis in severe hemorrhage models. The technique matters as much as the product: you must pack the wound tightly, applying direct pressure for a minimum of three minutes (five minutes for QuikClot products).
A strong civilian-accessible alternative is Celox hemostatic gauze, which uses chitosan — a naturally derived compound from shellfish shells — as its active agent. Celox works independently of the body's normal clotting cascade, which makes it particularly effective in patients on blood thinners or with clotting disorders. It's also available in granule form for wounds with irregular geometry. Note that Celox granules should not be used in chest wounds due to the difficulty of removal, but Celox gauze is appropriate for wound packing across most locations.
Wound packing technique is critical and must be learned through hands-on training, not just reading. Contact your local Stop the Bleed course, a wilderness medicine program, or a TCCC certification course to practice on simulated wound models.
Pressure Dressings: Securing the Pack and Managing Secondary Hemorrhage
Once a wound has been packed, you need a pressure dressing to maintain compression and hold the hemostatic gauze in place. The Israeli Bandage Emergency Pressure Dressing (4-inch) — formally known as the Emergency Bandage — is the benchmark product in this category. Developed by the Israeli Defense Forces and now used globally, it features an integrated pressure bar that allows the user to reverse the bandage and create a self-contained compression system using one hand. It can also function as a primary wound dressing, improvised sling, or tourniquets in austere environments when dedicated tools aren't available.
Carry at least two pressure dressings — a 4-inch for extremity wounds and a 6-inch for torso injuries if budget allows. These are inexpensive, lightweight, and have virtually unlimited shelf life when stored in their sterile packaging.
The Kit Itself: Organizing for Speed Under Stress
Your components are useless if you can't access them in seconds under extreme stress. A dedicated IFAK (Individual First Aid Kit) pouch keeps everything organized and immediately accessible. The NARESCUE Rescue Essentials IFAK Trauma Kit Pouch is purpose-built for this role. It features MOLLE-compatible attachment for mounting to a plate carrier, belt, or bag, with interior organization designed around TCCC principles. For urban preppers in apartments or suburban homes, this kit can be mounted inside a go-bag or stored in a readily accessible location — not buried in a closet.
Color coding and consistent organization matter. Every person in your survival group should be able to access anyone else's kit and find items in the same location. Practice opening and using your kit in low-light conditions and under simulated stress. For a complete overview of casualty movement after treatment, read our companion guide on improvised stretchers and casualty carries when no ambulance is coming.
Step-by-Step Instructions
Step 1: Establish Scene Safety and Don Gloves
Before touching any casualty, ensure the threat has been neutralized or you have moved the patient to cover. Pull on nitrile gloves immediately — bloodborne pathogen exposure is a real risk, and compromised hands eliminate your ability to provide further care. In an active threat scenario, apply your own tourniquet before assisting others if you are wounded.
Step 2: Identify and Expose All Wounds
Use trauma shears to cut away clothing from the wound site. Gunshot wounds frequently have both entry and exit wounds, and clothing obscures secondary injuries. Conduct a rapid head-to-toe scan, running your hands along the body to detect hidden wounds — blood-soaked clothing on the back is easily missed in the chaos of the moment. Use a permanent marker to note the location and number of wounds.
Step 3: Apply Tourniquet to Extremity Hemorrhage Immediately
For any limb wound with significant arterial bleeding, apply your CAT tourniquet 2-3 inches above the wound — not over a joint. Thread the strap, tighten until bleeding stops (not just slows), and wind the windlass until you meet firm resistance and the distal pulse is gone. Lock the windlass, secure the clip, and write the time of application in large letters on the white label with your permanent marker. This time notation is critical for the receiving medical provider.
Step 4: Pack Wound Cavities with Hemostatic Gauze
For wounds not amenable to tourniquet application (groin, axilla, neck, torso), open your QuikClot Combat Gauze or Celox gauze and pack it directly into the wound cavity. Do not simply lay it on top — push the gauze deep into the wound with your finger, layering it in as tightly as possible until the cavity is completely filled. Apply firm, direct pressure with the heel of your hand for a minimum of three to five minutes without releasing. Premature release of pressure is the most common cause of repacking failure.
Step 5: Seal Chest Wounds with Vented Chest Seal
For penetrating chest wounds, wipe the skin as dry as possible with gauze or clothing. Peel the backing from the Hyfin Vent Chest Seal and apply it directly over the wound, pressing firmly from the center outward to eliminate air pockets under the adhesive. Apply a second seal to any exit wound on the back. Monitor the patient continuously — if breathing deteriorates or neck veins distend, temporarily lift the edge of the seal to vent trapped air.
Step 6: Apply Pressure Dressing Over Packed Wounds
Secure the wound packing with an Israeli Bandage pressure dressing. Thread the bandage around the limb or body part, use the integrated pressure bar to reverse direction and increase compression, and secure the closing bar firmly. The dressing should be tight enough to maintain pressure on the packed gauze without cutting off circulation to uninjured tissue.
Step 7: Position the Casualty and Prevent Hypothermia
Lay the patient flat unless they have a chest wound, in which case allow them to sit at a 45-degree angle if they prefer. Wrap them in a mylar emergency blanket immediately — hypothermia dramatically worsens coagulation and accelerates hemorrhagic shock even in mild temperatures. Hypothermia is one of the three components of the "lethal triad" in trauma (along with acidosis and coagulopathy) and kills trauma patients who might otherwise survive.
Step 8: Reassess, Document, and Prepare for Evacuation
Continuously reassess the patient's mental status, breathing, and wound sites every two minutes. Check that tourniquets remain tight and that wound packing has not soaked through — if it has, do not remove the original packing; add more gauze on top and increase pressure. Note the time of all interventions, the mechanism of injury, and the patient's last known vital signs. This information is critical for medical handoff. For comprehensive wilderness medical treatment beyond hemorrhage control, see our article on wilderness medicine for preppers treating life-threatening injuries when help is never coming.
Training: The Component You Cannot Buy
Equipment without training is false confidence. The Stop the Bleed program, offered free through the American College of Surgeons and available in virtually every urban and rural community in the United States, provides hands-on wound packing and tourniquet application practice in a two-hour course. TCCC (Tactical Combat Casualty Care) certification provides a deeper framework for managing multiple casualties in a tactical environment. Wilderness First Responder (WFR) courses are excellent for rural preppers who may face extended field care scenarios lasting hours or days before evacuation is possible.
Practice opening your kit and applying your tourniquet with one hand, in the dark, wearing gloves. This is not dramatic — it is the minimum standard of competence for anyone who carries this equipment. Your kit belongs in your bug out bag, your vehicle, and your home — staged where it can be reached in under ten seconds.
Frequently Asked Questions
What's the difference between a tourniquet and a junctional tourniquet, and do I need both?
A standard limb tourniquet like the CAT or SOFTT-W is designed to compress blood flow in an arm or leg and can only be applied at least 2 inches above the wound on a limb. A junctional tourniquet is specifically designed for wounds at the groin, armpit, or pelvis — areas where a standard tourniquet cannot physically be positioned. For a basic gunshot wound kit, a standard tourniquet is the priority. If you are building an advanced trauma kit, adding a junctional tourniquet significantly expands your capability against the most lethal wound locations.
How long can a tourniquet stay on before it causes permanent damage?
Current medical literature indicates that tourniquet times under two hours carry a very low risk of permanent nerve or muscle damage, particularly with modern wide-strap designs. Military data shows that the vast majority of complications occur with tourniquets applied for more than six hours or applied incorrectly (too loosely, causing venous congestion without arterial occlusion). The critical rule is: apply it tight enough to stop bleeding completely, note the time, and get the patient to a higher level of care as quickly as possible. Never remove a tourniquet in a prehospital setting once it has been applied for a significant bleed.
Can I use a chest seal on a non-gunshot wound, like a stab wound or impalement?
Yes — chest seals are appropriate for any penetrating chest wound that creates an opening in the thoracic cavity, including stab wounds. However, do not remove an impaled object; seal around it as best you can and stabilize the object in place to prevent further internal damage. For impalement injuries, you will likely need to improvise around the object rather than using a standard chest seal directly. For any open chest wound where you cannot achieve a good seal, a gloved hand maintaining direct occlusion of the wound while awaiting a proper dressing is an acceptable bridge intervention.
Recommended Gear
To complete your gunshot wound trauma kit, consider these additional proven options. The SOFTT-W SOF Tactical Tourniquet Wide is an excellent second tourniquet to carry alongside your CAT, particularly for larger-limbed individuals where the wider strap provides better occlusion. For junctional wounds at the groin or axilla, the SAM Medical Junctional Tourniquet is the civilian-accessible gold standard. Round out your hemostatic options with Celox hemostatic gauze as a backup to QuikClot, particularly valuable for patients who may be on anticoagulant medications — a common consideration in real-world civilian trauma that military doctrine doesn't always address.
Affiliate Disclosure: SHTFPlan.net participates in the Amazon Services LLC Associates Program. Some links are affiliate links — we may earn a small commission at no extra cost to you.