Improvised Tarp Shelter: How to Build 10 Emergency Shelters from a Single Tarp
A single tarp can save your life — if you know how to rig it. Master these 10 proven shelter configurations for any terrain, season, or emergency.
A single tarp may be the most versatile piece of survival gear you can carry. Lightweight, packable, and inexpensive, it can mean the difference between a miserable night exposed to the elements and a dry, protected shelter that keeps your core temperature stable while you figure out your next move. Whether you're a suburban prepper executing a bug-out plan, an apartment dweller evacuating ahead of a flood, or a backcountry survivalist riding out a SHTF scenario in the wilderness, knowing how to configure a tarp shelter is a foundational skill that belongs in every emergency preparedness toolkit.
According to FEMA, approximately 40% of Americans have no emergency shelter plan beyond returning home — which may not always be an option. When disaster strikes and you're moving on foot, a quality tarp in your bug out bag combined with solid rigging knowledge gives you options that most people simply don't have. Let's break down 10 field-tested tarp configurations so you can match the right shelter to your situation.
What You Need Before You Build Any Tarp Shelter
Before covering specific configurations, let's talk about materials. Not all tarps are created equal. For serious emergency preparedness, avoid the flimsy blue poly tarps from the hardware store — they're loud, highly visible, and degrade rapidly under UV and wind stress. The Aqua Quest Guide Tarp is a purpose-built waterproof survival tarp made from 70D ripstop nylon with taped seams — it's the kind of gear that holds up when conditions get serious. For ultralight bug-out loadouts, the DD Hammocks SuperLight Tarp offers a multipurpose camping tarp solution that weighs almost nothing and packs down to fist size — ideal when every ounce matters.
Alongside your tarp, you'll need:
- Paracord or guylines: At least 50–100 feet. Rothco 550 paracord is mil-spec rated and works perfectly for ridgelines, guy-outs, and lashing — it's a must-have component of any tarp setup.
- Tarp tensioners: The Nite Ize Figure 9 tarp tensioner eliminates the need to tie complicated knots under stress — just loop your cord and crank it tight. In cold, wet conditions with shaky hands, these are invaluable.
- Stakes or improvised anchors: Carry 6–8 aluminum or titanium stakes, or know how to dead-man a stake using rocks, sticks, or debris.
- A knife or multi-tool for cutting cord and clearing attachment points.
For budget-conscious preppers or those building vehicle emergency kits, the Coghlan's heavy duty emergency tarp is a dependable, affordable option that stores flat in a vehicle trunk or bug-out bag without breaking the bank. Keep one in your car, one in your bag, and one at your bug-out location.
The 10 Tarp Shelter Configurations Every Prepper Should Know
1. The Ridgeline A-Frame
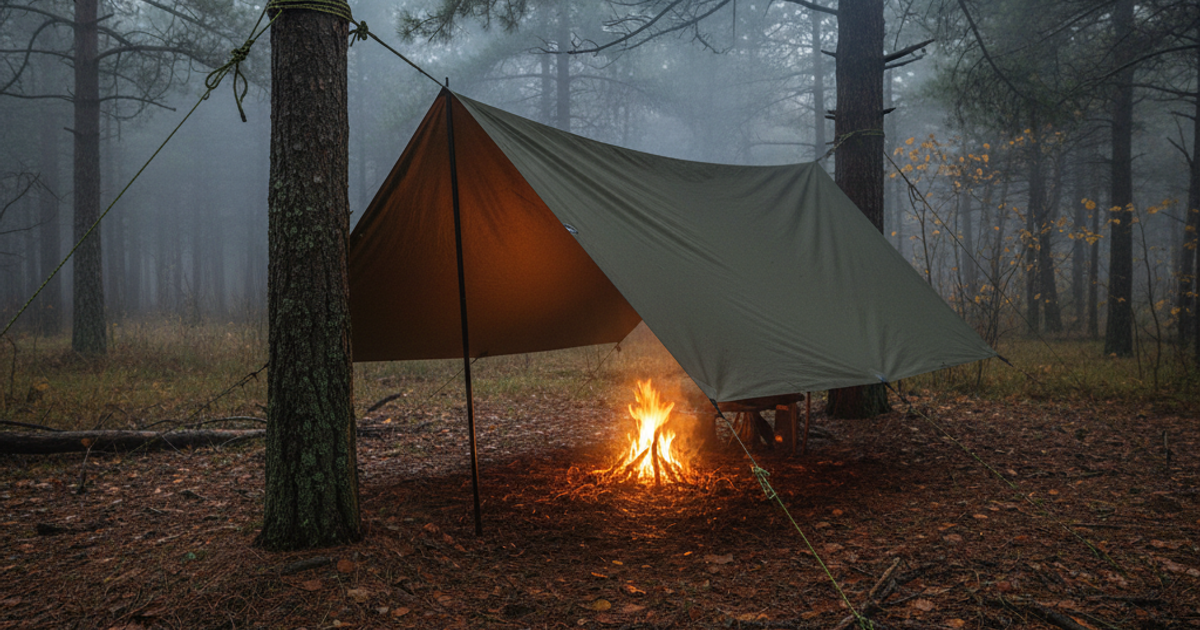
This is the gold-standard tarp shelter — simple, effective, and fast to pitch. Tie a ridgeline between two trees or poles at waist to chest height. Drape your tarp over the line so equal sections fall on each side. Stake out the sides at a low angle to the ground. The result is a tent-like structure with excellent rain runoff and reasonable wind resistance. Pitch it with the closed end facing into the wind. This works in forests, parks, and even alongside urban structures where two anchor points exist.
2. The Lean-To
The lean-to is the fastest shelter you can build — critical in deteriorating weather. Run a ridgeline between two anchor points or tie off to a fence, wall, or vehicle. Attach one edge of the tarp to the ridgeline and stake the opposite edge out low to the ground at an angle. Face the open side away from wind and rain. The lean-to is especially practical in urban survival situations where walls and structures provide one side of your anchor system. It won't win any warmth awards in winter, but it keeps you dry in minutes.
3. The Plow Point (Diamond Pitch)
Orient your tarp as a diamond. Tie the leading corner forward to an anchor point and stake the two side corners out low. The rear point either stakes down or you crawl in from that end. This creates a low-profile, wind-cutting shelter with a small interior. It's effective in open terrain with limited tree cover — think suburban greenbelts, fields, or exposed ridgelines. The plow point sheds wind and rain exceptionally well when pitched low.
4. The Wedge Tarp (Flat Pitch with Angle)
Stake one long edge of the tarp to the ground. Run a ridgeline from the center of the opposite long edge to a forward anchor point, creating an angled wedge. This is one of the best shelters for high-wind environments because the low profile reduces surface area. The wedge offers surprising interior volume and works well on open ground with limited vertical anchor points.
5. The Enclosed A-Frame (Burrito Roll)
Build your standard A-Frame, then use extra cord to close one or both ends. Fold the tarp material inward and stake it, or use additional cordage to cinch the ends. The enclosed A-Frame dramatically improves heat retention — critical if you're sheltering through cold nights without a fire. This is the configuration to use when situational awareness demands you stay hidden and a fire isn't an option. Pair this with a quality sleeping bag or emergency bivy and you have a legitimate survival bedroom.
6. The Tarp Tube Tent (Solo Cocoon)
No ridgeline? No problem. Fold your tarp lengthwise. Run a single line of cord through the interior fold from end to end and tie off both ends to anchor points — trees, fence posts, door handles in a pinch. The tarp hangs tube-shaped, creating an enclosed sleeping space you can crawl into from either end. This is an excellent urban survival configuration because it requires minimal anchor height and can be set up in alleys, under overpasses, or against structures. It's also a solid 72-hour walking evacuation shelter when you're moving through mixed environments.
7. The Basha Shelter (Military Fold)
Used by military forces worldwide, the basha involves folding one-third of the tarp under itself before pitching. This creates a double-layered floor on one side and a raised roof on the other. It offers excellent moisture protection from ground contact — critical because conductive heat loss through cold or wet ground is one of the leading causes of hypothermia in survival scenarios. The basha is ideal when ground moisture is a primary threat.
8. The Super Shelter (Tarp + Reflective Layer)
Combine your tarp with an emergency mylar blanket or reflective sleeping bag to create a heat-trapping microenvironment. Pitch your tarp low in an A-Frame or lean-to configuration, then line the interior with mylar. Body heat reflects back at you and interior temperatures can rise significantly. In a winter survival situation, this configuration can be life-saving. This is one reason every survival kit should carry both a quality tarp and multiple emergency blankets — they stack capabilities. See our guide on cold weather survival for more on managing heat in grid-down conditions.
9. The Rain Catchment Shelter
In a prolonged emergency where water purification is a priority, your tarp doubles as a rain collection system. Pitch it in an inverted V or bowl shape with a low center point and run a cord from that center downward into a collection container. A 10x10 tarp in moderate rain can collect several gallons per hour. This isn't just a shelter — it's emergency water infrastructure. In dry climates, this configuration can make the difference between survival and dehydration.
10. The Urban Tarp Screen (Grey Man Shelter)
In urban and suburban SHTF scenarios, visibility is a tactical problem. The grey man principle applies to your shelter as much as your appearance. A tarp rigged as a privacy screen between dumpsters, alongside a vehicle, under an overpass, or behind dense vegetation creates concealed sleeping space without advertising your presence or your supplies. Use earth-toned tarps — olive drab, coyote brown, or forest green — never blue or bright orange unless you're actively signaling for rescue. This configuration prioritizes operational security over comfort and is specifically designed for urban survival environments where drawing attention can be as dangerous as the weather.
Critical Tips That Apply to Every Tarp Shelter Configuration
- Site selection first: Choose ground that's slightly elevated, never in a depression where water collects. Avoid dead tree branches overhead, areas with evidence of animal activity, and locations directly downwind from other people.
- Guy-out angles matter: Stakes should be driven at a 45-degree angle away from the shelter. This maximizes tension and prevents pull-out under load.
- Leave drainage gap: Unless building a rain catchment shelter, make sure the tarp edges don't create a water dam around your sleeping area. A few inches of gap allows water to sheet away.
- Insulate from the ground: No tarp shelter is complete without a ground layer. Dead leaves, pine boughs, cut grass, cardboard, or a foam pad all work. Cold ground kills faster than cold air.
- Practice in daylight before you need to do it in the dark: Set up every one of these configurations in your backyard or a local park. Muscle memory is a survival skill.
Recommended Gear for Your Tarp Shelter Kit
Building a compact tarp shelter kit means choosing gear that serves multiple functions. The 15 essential uses for a tarp in survival situations extend far beyond shelter — from ground cloth to stretcher to signal panel — which is why investing in a quality tarp is one of the highest-value decisions in your survival gear budget. Match your tarp with quality cordage, reliable tensioners, and a sharp blade, and you have a shelter system that weighs under two pounds and handles nearly any scenario you'll encounter on a bug-out or evacuation.
What You'll Need
- One tarp (minimum 8x10 feet, larger is better)
- 50-100 feet of paracord or rope
- 8-12 tent stakes or improvised anchors (rocks, logs, sticks)
- Knife or cutting tool
- Carabiners or cord tensioners (optional but helpful)
Step-by-Step Instructions
Step 1: Assess Your Environment and Choose Your Shelter Design
Survey your surroundings for natural anchor points like trees, rocks, or sturdy branches before selecting which of the 10 shelter configurations to build. Consider weather conditions: use an A-frame for rain, a lean-to for wind protection, or a flying diamond for maximum ventilation in fair weather. Evaluate the terrain for drainage and level ground, avoiding low spots where water can pool. Your choice should balance available materials, weather protection needs, and the time you have to construct the shelter.
Step 2: Secure Your Primary Ridgeline or Anchor Points
String a ridgeline between two trees at chest to shoulder height, ensuring it's taut and can support the weight of your tarp and wind load. If trees aren't available, use trekking poles, sturdy branches, or stack rocks to create vertical supports. For ground-level shelters like the burrito or wedge, identify where you'll stake out the corners first. Test all anchor points by pulling firmly to ensure they won't fail during setup or in wind.
Step 3: Drape and Position Your Tarp
Throw your tarp over the ridgeline or position it according to your chosen design, ensuring equal distribution of material where needed. For A-frame and lean-to shelters, center the tarp on the ridgeline with even sides. For ground configurations like the diamond fly or arrowhead, lay the tarp flat and orient it to maximize coverage based on wind direction. Make sure grommets or tie-out points are accessible and the tarp isn't twisted or bunched.
Step 4: Stake Out the Primary Corners
Begin by securing the two most critical corners that establish your shelter's shape, pulling the tarp taut at a 45-degree angle to the ground. Drive stakes at a 45-degree angle away from the shelter to maximize holding power, or tie off to nearby trees or weighted rocks. Maintain consistent tension to prevent sagging and water pooling. For elevated designs, these initial stakes create the foundation that all other attachment points will reference.
Step 5: Establish Additional Tie-Out Points
Work around the shelter systematically, securing remaining grommets and creating extra tie-outs along edges where needed for stability. Use a trucker's hitch or taut-line hitch knot to allow for tension adjustment as weather conditions change. For shelters requiring more tie-outs than your tarp has grommets, attach cord to the edges using small stones wrapped inside the tarp material. Space tie-outs evenly to distribute wind load and prevent stress points that could tear the fabric.
Step 6: Adjust Tension and Create Proper Pitch
Walk around your shelter and fine-tune each line to eliminate sagging and create water-shedding angles of at least 45 degrees on all surfaces. Bounce test the tarp by pressing firmly on various sections—it should spring back without excessive slack or overly tight spots. Ensure all edges are either staked to the ground or elevated high enough for entry while maintaining structural integrity. Proper tension prevents flapping in wind, which creates noise and accelerates wear on both tarp and attachment points.
Step 7: Weatherproof and Prepare for Configuration Changes
Add extra guylines to vulnerable points if high winds are expected, and ensure water runoff will drain away from your shelter site. Practice converting your shelter between at least three different configurations so you can adapt to changing conditions quickly. Keep your knife and extra cordage inside the shelter for emergency adjustments during storms. Mark the positions of stakes and key knots so you can rebuild the same configuration rapidly if you need to take down and relocate your shelter.
Frequently Asked Questions
What size tarp is best for emergency shelter?
For a solo shelter, a 8x10 foot tarp offers enough material for most configurations with room to spare. For two people, go with 10x12 or larger. The key tradeoff is weight versus coverage — a larger tarp gives you more options but adds pack weight. If you're building a bug-out bag for urban or foot evacuation, an 8x10 silnylon or ripstop nylon tarp in the 14–20 ounce range hits the sweet spot between capability and packability.
Can I build a tarp shelter in an urban environment without trees?
Absolutely. Urban environments offer abundant anchor points that wilderness preppers don't have: fences, pipes, vehicle roof racks, dumpsters, fire escapes, bollards, and building corners. Paracord and a few carabiners let you rig between virtually any two fixed points. The tube tent and urban screen configurations were specifically designed for non-wilderness settings. The key is practicing improvised rigging so you can adapt to whatever anchor points are available in the moment.
How do I keep my tarp shelter hidden during a bug-out or SHTF scenario?
Color selection is your first line of defense — earth tones blend into most environments. Pitch low to reduce your silhouette, choose natural concealment like tree lines and brush rather than open ground, and avoid reflective materials unless signaling for rescue. Keep fire inside enclosed configurations or forgo it entirely in high-threat environments. Approach and leave your shelter from different directions to avoid creating visible trails. The grey man philosophy applies directly to shelter construction — your goal is to pass through or shelter in an area without leaving evidence of your presence.
Affiliate Disclosure: SHTF Plan participates in the Amazon Services LLC Associates Program. Some links are affiliate links — we may earn a small commission at no extra cost to you.