Storm Shelter Essentials: How to Choose, Build, or Buy the Right Underground Shelter for Your Family
Above ground or below? Prefab or DIY? Learn how to choose, install, and stock the right storm shelter to keep your family alive when disaster strikes.
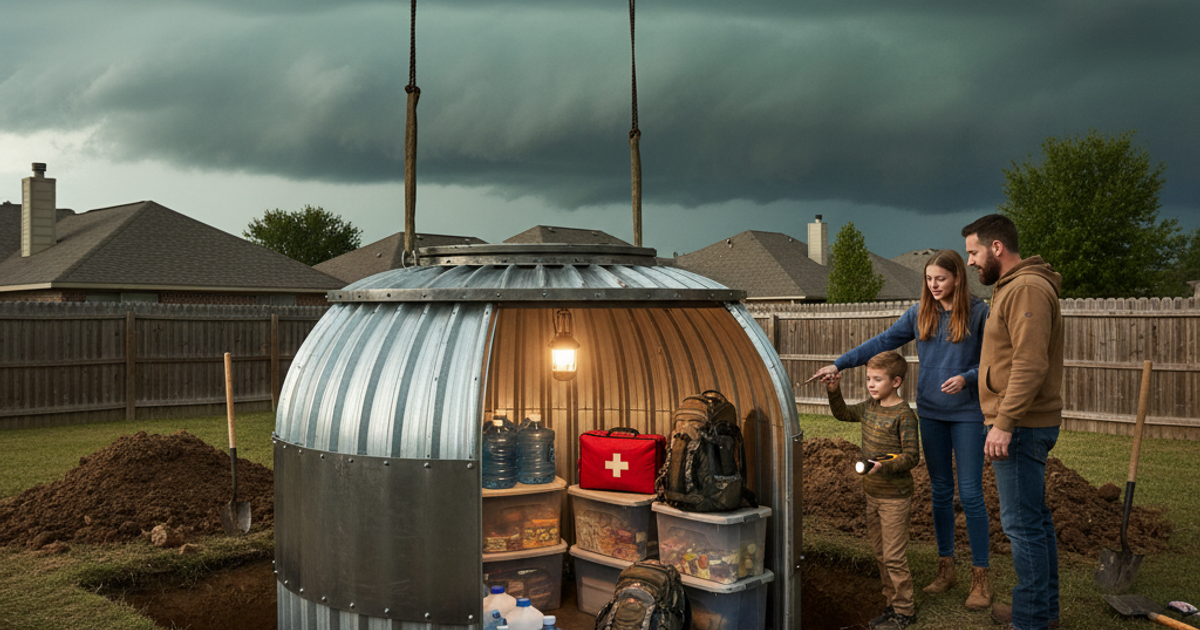
When a tornado warning sounds or a severe storm bears down on your neighborhood, you have minutes — sometimes seconds — to act. According to NOAA, tornadoes kill an average of 70 people per year in the United States, and thousands more are injured. The difference between life and death often comes down to one simple factor: whether you had a proper shelter in place before the storm arrived. Underground and prefab storm shelters represent one of the most reliable forms of emergency preparedness a family can invest in — and with today's options ranging from DIY-friendly in-ground solutions to compact safe rooms designed for apartments and suburban homes, there's an option for nearly every living situation.
This guide covers everything a serious prepper needs to know about choosing, building, buying, and stocking a storm shelter — whether you're on a rural homestead, a suburban lot, or working with limited space in an urban setting.
Understanding Your Threat Profile Before You Buy or Build a Storm Shelter
Before spending a dollar on a shelter, assess your actual risk. Tornado Alley — stretching from Texas through Kansas, Oklahoma, Nebraska, and into the Dakotas — sees the highest frequency of violent tornadoes, but EF3+ tornadoes have struck every state in the continental U.S. If you live in a hurricane-prone coastal region, your shelter needs differ slightly; underground shelters may be inappropriate in areas with high water tables or coastal flooding. Always check your local flood zone maps before committing to an underground installation.
Your threat profile also determines shelter depth, door rating, and venting requirements. FEMA's publication Taking Shelter from the Storm (P-320) outlines performance criteria for residential shelters and is freely available online. Use it as a baseline reference alongside guidance from your local emergency management office. For broader emergency preparedness planning beyond storm shelters, a solid family emergency plan should always be in place before you build or buy anything.
Types of Underground and Prefab Storm Shelters: What Your Options Actually Are
In-Ground Underground Shelters
The classic option for rural and suburban homeowners with yard access, in-ground shelters are typically constructed from steel, fiberglass, or reinforced concrete. They're installed below the frost line, which provides natural thermal regulation and superior protection against flying debris — the number one killer in tornado events. Costs range from $3,000 to $10,000 installed, depending on size, material, and your region's soil conditions. Steel units are the most common and affordable; fiberglass units resist corrosion better in wet climates; concrete offers maximum strength for hurricane-force winds.
Installation generally requires an excavator, a concrete pad or gravel base, and a licensed contractor for final anchoring. In most states, permits are required. The process typically takes one to two days once the unit arrives on-site.
Above-Ground Safe Rooms
For homeowners in areas with high water tables — much of Florida, Louisiana, and coastal regions — above-ground safe rooms are the preferred alternative. These can be prefab steel rooms installed in a garage or attached to an interior wall, or poured-concrete rooms built during home construction. FEMA-compliant above-ground safe rooms can withstand winds exceeding 250 mph. Installed costs typically run $5,000 to $15,000 for residential units. If you're interested in how to integrate a secure room inside an existing home structure, our article on building a safe room on a budget covers interior installation in detail.
Prefab Modular Shelters
Prefabricated steel shelters — like those manufactured by Survive-a-Storm, FamilySafe, or American Tornado Shelter — arrive ready to install. Many are rated to FEMA 320/361 standards and can accommodate families of four to ten people. These are the fastest option to deploy, with some units installable in a single afternoon with proper equipment. For the prepper community, modular shelters offer a bonus: they can be relocated if you move.
What About Urban and Apartment Dwellers?
Not everyone has a yard or a garage. If you live in an apartment or dense urban area, your "storm shelter" strategy focuses on identifying the safest interior space in your building — typically a ground-floor interior hallway, a stairwell, or a designated community shelter. Check with your building management about storm shelter protocols. For urban survivalists, hardening your urban survival posture means knowing these locations before the sirens sound, not after. Practicing situational awareness and having an exit plan for every building you regularly occupy is a non-negotiable habit.
How to Choose the Right Underground Shelter for Your Property and Budget
When evaluating shelter options, use these criteria:
- FEMA Compliance: Look for shelters tested to ICC 500 or FEMA P-320/P-361 standards. This ensures the unit has been third-party tested against extreme wind loads and debris impact.
- Capacity: Calculate your household size plus any neighbors or extended family you'd shelter with. Standard units run four to eight people; larger community shelters accommodate twelve or more.
- Access Time: How quickly can every member of your household reach the shelter from the farthest point in your home? Run timed drills. NOAA recommends you shelter within 30 seconds of a warning — and real-world lead times are often less.
- Water Table and Drainage: Request a soil report or consult a local contractor before purchasing an in-ground unit. Shelters that flood are worse than no shelter at all.
- Door Orientation: The shelter entrance should face away from the prevailing storm direction (typically northeast in Tornado Alley). Check manufacturer guidance.
- Ventilation: Any enclosed shelter needs an interior vent pipe that remains functional even if the exterior is buried in debris. Some units include dual vents for redundancy.
Installing a Prefab Storm Shelter: What the Process Actually Looks Like
For a standard in-ground fiberglass or steel unit on a suburban lot, the installation process follows these general steps:
- Permitting: Pull any required building permits. Most jurisdictions require a simple application; some offer grants or rebates for shelter installation. Oklahoma, for example, has historically offered state rebates of up to $2,000.
- Site Selection: Choose a location no more than 50 feet from your home's main door to ensure rapid access. Mark all underground utilities using your local 811 call-before-you-dig service.
- Excavation: Hire a local excavator or rent equipment. The hole should be slightly larger than the shelter footprint to allow backfill.
- Anchor Installation: Most prefab units include anchor straps or concrete deadman anchors to prevent the empty shelter from floating upward during heavy rains — a genuine risk if your water table is high.
- Backfill and Grading: Once the unit is anchored and electrical or vent lines are run, the hole is backfilled and graded to divert surface water away from the hatch.
- Final Inspection: Walk through the shelter, test the door latch, confirm ventilation, and run your family through an access drill.
What to Stock Inside Your Storm Shelter: Emergency Preparedness Essentials
A shelter is only as useful as what you keep in it. Storm events can strand families underground for hours — and in a SHTF scenario where infrastructure collapses, that duration could extend significantly. Stock your shelter with the following:
Food and Water
Emergency food storage inside a shelter should cover at least 72 hours per person. The Augason Farms 72-Hour Emergency Food Supply Kit is a well-regarded option — compact, calorie-dense, and shelf-stable for years. It stores flat and doesn't take up significant space in a tight shelter environment.
Water is equally critical. Store a minimum of one gallon per person per day, and include a backup water purification device in case your stored supply runs out or becomes contaminated. The LifeStraw Family Water Filter is an excellent shelter inclusion — it filters up to 18,000 liters without chemicals or electricity, making it a true long-term survival gear investment for any enclosed survival space.
Light and Communication
Power outages are universal in severe storm events. The Streamlight Siege Battery-Powered Lantern is built to military spec and throws enough light to illuminate a full shelter interior while running efficiently on standard AA batteries. Keep two in your shelter — one primary and one backup.
For weather monitoring, never rely solely on your phone. The Midland WR400 Weather Alert Radio receives NOAA All Hazards broadcasts and can alert your family to developing threats even when your cell signal fails. It's also invaluable for post-storm situational awareness — knowing when it's safe to emerge is just as important as knowing when to shelter.
Warmth and Comfort
Underground shelters maintain relatively stable temperatures, but hypothermia can become a factor during winter storm events or extended stays. Include a UST Emergency Mylar Sleeping Bag for each family member. These compress to nearly nothing, reflect body heat with remarkable efficiency, and can make the difference between a survivable wait and a dangerous one. They're also a smart addition to every bug out bag and vehicle kit.
Additional Shelter Supplies
- First aid kit with trauma supplies (tourniquet, Israeli bandage, QuikClot)
- Prescription medications in a 72-hour supply rotation
- Copies of critical documents in a waterproof bag
- Cash in small denominations
- A hand-operated can opener
- Sanitation supplies: waste bags, hand sanitizer, wet wipes
- A charged power bank for phones
- A pry bar or breaker bar in case the hatch becomes blocked by debris
- Activities for children — a deck of cards goes a long way
For a complete checklist approach to stocking your survival kit, cross-reference the tornado preparedness guide on this site, which includes shelter-specific protocols for before, during, and after violent storm events.
Maintenance, Drills, and Long-Term Shelter Management
A shelter you haven't visited in two years is a liability, not an asset. Build a quarterly maintenance routine:
- Inspect the hatch seals and door hardware for rust or wear
- Rotate food and water stores (consume and replace)
- Test the weather radio and replace batteries
- Check for moisture intrusion or insect activity
- Run a timed family drill — every household member should be able to reach the shelter and get the door closed in under 60 seconds
Involve your children in drills from an early age. Familiarity with the shelter reduces panic during real events. Our guide on teaching kids survival skills and emergency preparedness offers practical age-appropriate frameworks for building this kind of readiness into your family culture.
What You'll Need
- Soil testing kit or professional geological survey
- Building permits and zoning documentation
- Tape measure and property survey map
- Notebook for recording measurements and specifications
- Calculator for budget planning
- Camera or smartphone for documenting potential sites
Step-by-Step Instructions
Step 1: Assess Your Property's Geological Suitability
Begin by determining if your land can support an underground shelter by checking soil composition, water table levels, and bedrock depth. Contact your local utility companies to mark underground lines before any digging assessment. Clay-heavy soil may require additional drainage systems, while high water tables might make underground construction impractical. A professional geological survey costs $300-800 but prevents costly mistakes during installation.
Step 2: Determine Your Shelter Size and Capacity Requirements
Calculate the minimum square footage needed based on 10 square feet per person for basic storm protection or 20-30 square feet per person for extended stays. Consider how many family members, pets, and potentially neighbors you need to accommodate during emergencies. Factor in additional space for supplies, ventilation systems, and sanitation facilities. Most families of four require a shelter between 80-120 square feet for adequate comfort and safety.
Step 3: Choose Between Pre-Fabricated, Custom-Built, or DIY Options
Evaluate pre-fabricated steel or fiberglass shelters ($3,000-$15,000) for quick installation, custom-built concrete bunkers ($20,000-$70,000) for maximum durability, or DIY shipping container conversions ($5,000-$12,000) for budget-conscious builders. Pre-fabricated units install in 1-3 days but offer limited customization, while custom builds take 2-6 weeks with extensive personalization options. Research manufacturers' certifications, warranty coverage, and compliance with FEMA standards before making your decision.
Step 4: Select the Optimal Location on Your Property
Position your shelter at least 10 feet from your home's foundation to prevent structural damage and ensure a safe escape route separate from your house. Choose higher ground when possible to minimize flooding risks, but avoid areas directly under large trees that could create debris hazards. The entrance should be easily accessible from your home yet concealed from casual view for security purposes. Verify that emergency vehicles can access the area if rescue becomes necessary.
Step 5: Install Essential Life-Support and Safety Systems
Equip your shelter with a reliable ventilation system providing at least 3-5 cubic feet of air per minute per occupant, using either hand-crank or battery-powered fans with filters. Install a sump pump with battery backup to manage water intrusion, and add a carbon monoxide detector plus fire extinguisher rated for enclosed spaces. Include communication equipment such as a weather radio, cell phone signal booster, and emergency whistle. Ensure your shelter has at minimum two exits to prevent entrapment from blocked doorways.
Step 6: Stock Critical Supplies for Extended Shelter Use
Store a minimum 72-hour supply of water (one gallon per person per day), non-perishable food, prescription medications, and first aid supplies in waterproof containers. Include battery-powered lighting, extra batteries, blankets, change of clothes, and hygiene items including portable toilet supplies. Rotate food and water supplies every six months and check battery expiration dates quarterly. Keep important documents in waterproof bags along with cash, emergency contact lists, and copies of insurance policies.
Step 7: Conduct Regular Maintenance and Family Drills
Inspect your shelter quarterly for water damage, rust, structural cracks, and verify all mechanical systems function properly. Practice shelter access drills with your family at least twice yearly, timing how quickly everyone can safely enter and ensuring children know the procedures. Test your ventilation system, communication devices, and lighting during each drill to identify any equipment failures before an actual emergency. Update your emergency plan and supplies as your family's needs change with new members, medical conditions, or seasonal considerations.
Frequently Asked Questions
How deep does an underground storm shelter need to be?
Most residential in-ground shelters are installed with the top of the unit 12 to 18 inches below grade, with the hatch extending above ground for access. The shelter itself is typically 4 to 7 feet deep interior clearance. The primary goal isn't extreme depth — it's having sufficient soil and concrete coverage to protect against debris impact and structural collapse from above. Always follow manufacturer specs and local building codes, which account for your region's frost line and soil conditions.
Can I install a storm shelter if I rent or live in an apartment?
If you rent a house with a yard, you can potentially negotiate shelter installation with your landlord — especially in high-tornado-risk areas where some states offer financial incentives. For apartment dwellers, an underground shelter isn't a realistic option. Your preparedness focus should shift to identifying the safest structural areas in your building (interior rooms on the lowest floor, away from windows), keeping a well-stocked emergency kit in your unit, and establishing a community shelter protocol with building management. Above-ground safe room inserts are available for garage installations and may be an option if you own a home without yard space.
How much food and water should I store in my storm shelter?
FEMA recommends a minimum of 72 hours of supplies per person, but serious preppers stock for 7 to 14 days. For water, plan for at least one gallon per person per day — more if you have pets, young children, or medical needs. Calorie-dense, shelf-stable emergency food kits are ideal for shelter storage because they require minimal preparation. Pair your food stores with a reliable water filtration device in case your stored water runs low, and rotate all supplies at least once per year to maintain freshness and potency.
Affiliate Disclosure: SHTF Plan participates in the Amazon Services LLC Associates Program. Some links are affiliate links — we may earn a small commission at no extra cost to you.